Showing posts with label tutorial. Show all posts

Saturday, December 15, 2012

Tutorial: The World’s Easiest Pillowcase


The world’s easiest pillowcase is an ideal gift because it looks a million dollars and it is really a piece of cake.

It is an envelope pillowcase which means that you do not need any buttons or ribbons to close it (which always feel uncomfortable on a pillow to me anyway). Nevertheless it is still a pillowcase which you can take off the pillow easily and throw it into the washing machine (very important with a little one with chocolate hands ;-))
It is so easy that I could draw the how to on a single page and I promise I haven’t left out a single step...
 
... except turning the pillowcase inside out in the end and stuffing a pillow in it. But I guess you would have figured that out yourself, wouldn’t you?
Don’t worry about the lengths and the width not including any seam allowance. It is a trick and not a mistake, because if the pillowcase is a tiny bit smaller than the pillow itself, the pillow will look wonderfully plush.
From my point of view a thicker cotton fabric works best, because it stays in place but is also pleasant on the skin. Stretchy fabrics are a bit tricky, but work as well. Really you cannot do wrong with this pillowcase.
Depending on the design you chose the pillow can look very feminine or very masculine, very subtle or screaming, very soft or a bit rustic.
Since I needed a Christmas present for my uncle who is the proud owner of a little forest in Bavaria, I opted for a masculine, wooden look with a soft interior...
that is the back - you can hardly see the opening in the middle, can you?
Doesn’t that wood effect look cool? I found this fabric at Ikea and immediately I knew it was the perfect fabric for this project.

Monday, June 28, 2010

Baby Soccer – Ball Tutorial

Every Monday I will post something related to babies: inspiration, craft projects, baby news, and discoveries I have made in this new and exciting world for me. I hope you come along on that rollercoaster ride with me.
* * *

I cannot believe it. We made it. We are in the quarter final of the World Cup. The game was a thriller. Well worth getting up in the middle of the night.

So now there is no excuse to postpone the baby soccer ball tutorial any further. If our boys can beat England 4:1, I can manage to finally post this tutorial.

This project is a great way to make use of scrap fabrics. And it is really easy, believe me.

The first step is the hardest – make a 13cm regular pentagon template. That means the distance between each side and its opposite corner is 13cm.

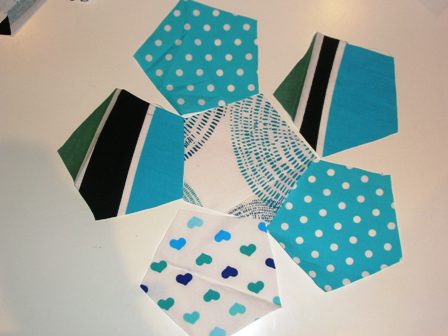
Use the template to cut out 12 pentagons. I used scrap fabric in different shades of turquoise. Arrange them so that different fabrics are next to each other.

With right sides facing pin and then sew two shapes together.

Sew five shapes together so that they build a row shown below.

Add the sixth shape on top so that a half ball is formed.

Then repeat these steps for the second half of the ball, sew both halves together leaving a gap open. Fill with toy stuffing (and some little bells if you want) and the handstich the gap together.

Voila, your baby is ready for his or her first training session ;-)

Monday, June 21, 2010

Sorry...

... I know I promised you a tutorial last week. And now there is none. I hope you are not too disappointed, but I just haven’t managed to get it done. Little Victoria had some belly ache and therefore needed me 24/7 – all my attention and lots of rocking and belly-rubbing and cycling and cuddling.

The only thing I can do right now is to reveal that the trigger was for a baby soccer ball. And I’ll do my best to finish the tutorial for next Monday.

Friday, May 28, 2010

Quick changing mat cover


As I am still waiting for my little one to have her big entrance into the world, I thought you might want to know how I did the super-easy, super-cosy changing mat cover, which I showed you last week. It doesn’t really deserve the name tutorial, because it is that simple.


All you need is a standard, plastic-covered changing mat:

A soft, cotton fabric about twice as wide and a about 20cm longer than the changing mat:
plus needles, sewing machine and matching threat.

First you lie the fabric flat on the floor – right side facing up – (a little ironing wouldn't have hurt either ;-)), seam the short ends of the fabric (or use blankets that are already seamed like I did) and place the changing mat on top – roughly in the middle of the piece of fabric:

Fold first one side...


... and then the other side over the changing mat:

Pin upper and bottom ends of the fabric together (with the changing mat still inside) and make sure the seam is not too tight, then remove the changing mat and sew the top and bottom seams together:

Turn the finished cover ...

...and voila. You have a warm and comfortable cover for the plastic changing mat. They are super-easy to wash, so just make sure you make more than one. That way you always have one at hand if the first one needs a washing.

Sunday, April 11, 2010

Beautified Parcels

A lot of my friends in Germany are pregnant as well. Yes, we are of that certain age. Or in that certain phase of life. ;-) Therefore I did a lot of crafting for babies in the last couple of weeks. I am surely going to share more of these crafting projects in the near future... but for now, I am in a hurry, because I need to send the parcels off to Germany so that they arrive in time for the arrival of the little ones.

So my Sunday craft project is to beautify parcels to send my pressies off to Germany. It is easy. It is quick. It is cheap. It makes such a difference. Like a second layer of wrapping paper around your presents. So the addressee can get excited as soon as she or he picks the parcel up at the local post office or finds it in the mail box.

All you need is an old parcel or box or envelope (yay for recycling!)...

... and a stamp (which you may recognise from here), an ink pad as well as a water-resistant marker

Then de-construct and unfound the parcel/ box – cut old adhesive tape open if needed...

... and turn in inside out. Then you can go crazy with the stamp: make sure you cover all outside areas, turn the stamp to create more dynamic or stamp clean straight lines if you are more of the accurate type of ‘stamper’.

Re-construct parcel/ box and use adhesive tape if needed to get it back into its original shape.

Fill the box with the presents. Add sender and addressee with the water-resistant pen either directly onto the parcel or onto a sticker... and the parcel is ready to go.

Need another reason why making your parcels look beautiful pays off? I read that if you want your parcel to arrive safely and in perfect condition, it helps a lot if they look as if the sender really cares about it. In other words, if the parcel looks great. Don’t bother sticking “handle with care” stickers or tape onto it, research has shown that postal workers are ‘blind’ to these neon messages. But they have a soft spot for beautiful packaging. And who would blame them – they need a ray of sunshine or a burst of colour or a smiling lion in their grey daily routine. So make your postie happy as well!

Monday, April 5, 2010

Stamp printed baby onesies

Every Monday I will post something related to babies: inspiration, craft projects, baby news, and discoveries I have made in this new and exciting world for me. I hope you come along on that rollercoaster ride with me.
* * *

Although I promise you to reveal what this teaser ...
... is all about on Saturday, I didn’t. I am very sorry, but I just got inspired and carried away by all that beautiful art. Nevertheless I don’t want to deny you the solution of my colourful teaser. I printed cute baby onesies on Friday. It is very easy. It is lots of fun. The result looks great. And therefore I have prepared a little tutorial for you.

All you need is:
  • a blank onesie (or even better a couple of them, because once you get into the swing, I promise, you don’t want to stop) – I have washed them beforehand to get rid of all potential softeners and other nasties which might impact the fabric colour and your baby
  • stamps – self-made or bought, foam or rubber
  • fabric colour – I used liquid one, but you could also use a pen, I used pebeo setacolor opaque in indigo, but any other fabric colour works as well (just look at the using and fixing suggestions on pack)
  • a small paint brush
  • aluminium foil
  • baking paper
  • an iron

I covered a small chopping in aluminium foil and put it into the little onesie. I also covered the surface of my working table in aluminium foil, because I knew I would make a mess with the colour. And fabric colour really stains very well.

I cleaned my stamps with some warm water and soap from all other ink residues.

 
Then I stirred the fabric colour so it got mixed up well and added some colour on a piece of aluminium foil and use the brush to evenly spread it into a circle (a bit bigger than the size of the stamp).

Now I pushed the stamp into the circle of colour.

Quick check that the colour is evenly spread on the stamp. Otherwise add more colour with the brush or push it again into the colour.

Place coloured stamp onto the onesie. Make sure you choose the right position first. Once it is on the fabric it is on the fabric. No room for changes.

Gently press the stamp with your fingers – make sure that also the edges of the stamp are pushed down.

Lift the stamp up and try to avoid smearing the colour or stamp. And voila – your first printed stamp. It might look a bit irregular at times, but that is what a hand-made, original piece should look like, shouldn’t it. If you are a bit of a perfectionist, however, you can also use the brush and left-over paint to make it look more regular.

Spread the remaining colour again evenly on your aluminium palette (add more colour only if needed) and again press a stamp into the colour circle. I love repetitive patterns on one onesie, but you could also go wild and use a variety of different stamps.

After the colour has dried sufficiently (my instructions on the fabric colour said 5 minutes, but I left in drying a bit longer) so that the colour doesn’t appear liquid anymore but seems to have ‘sunk into’ the fabric completely, place a small piece of baking paper over the printed stamp and iron it for 1 minute while putting a bit pressure on it. I use the hottest setting on my iron possible and tried to make sure to move the iron around so that I don’t burn the fabric. Afterwards I let it cool for about 1 minute, peeled off the baking paper. Then put it over again and ironed it for another minute – just to make sure it is properly fixed.

Voila. Ready. Your unique piece of baby fashion is done. And you can wash it at 40C (100F) which is essential for all the stains a little baby is capable of producing from day one ;-)

I hope you enjoyed this quick and happy baby project. Please let me know if you have any additional questions. And enjoy to get absolutely mad while stamping the day away!

Saturday, March 6, 2010

Fabric decorated Baby Onesie Tutorial

Today it was raining cats and dogs today – with thunderstorms, hail and flooding in the afternoon. Yes, that is supposed to be summer in Melbourne ;-)

So the best thing you can do is... crafting. And today I want to show you my latest baby project: baby onesies decorated with scrap fabric elements.

It is a great project. Super-easy! Super-quick! Super-chic! Super impressive! I made a couple for all my friends, who expect babies at the moment, and some for my little one as well. And it didn’t take me longer than 2 hours. So much fun!!!

All you need is:
Iron the onesie and the piece of scrap fabric.

Cut out a piece of Vliesofix and iron it with its sticky side onto the left side of the piece of scrap fabric (that is the side where the colour looks more faded, also often called the 'wrong side'). The recommendation is to iron it for 3-4 seconds on heat ** with dry heat.

The Vliesofix should cover the piece of scrap fabric completely (be careful the Vliesofix will become very sticky and will stick to the ironing board very easily, make sure that you remove it quite quickly from the board).

Cut out the piece of scrap fabric accurately that you want on front of the onesie. Due to the Vliesofix the edges won’t frazzle.

That is how my piece of fabric looked afterwards.

Then peel back the paper side of the Vliesofix on the back of the piece of fabric.

Place the piece of fabric onto the onesies – wherever you want it to be. I positioned mine in the front middle. Then cover it with a damp cloth and iron it onto the onesie for 8-10 seconds, pressing it down lightly on heat **.

Let the finished onesie lay flat for 20 minutes to cool down. And then voila – admire it ;-)

I hope you find this tutorial helpful. It is my first, so please let me know if you have any questions or if there is anything I could improve.